容器 #
容器是一种特殊的进程,通过 namespace 和 cgroup 进行资源的隔离和限制。一个进程只能看到相同 Namespace 下的资源。
Mount Namspace #
Linux 提供了 chroot 命令,可以改变进程的根目录,如执行 chroot /tmp/rootfs /bin/ls,命令进程的根目录变为了 /tmp/rootfs,因此 ls 命令的输出就是 /tmp/rootfs 中的内容。
rootfs(根文件系统),挂载在容器的根目录,用于给容器进程提供隔离后执行环境的文件系统。
-
rootfs 中打包了整个操作系统的文件与目录,使得应用以及它运行所需的依赖都被封装在了一起
-
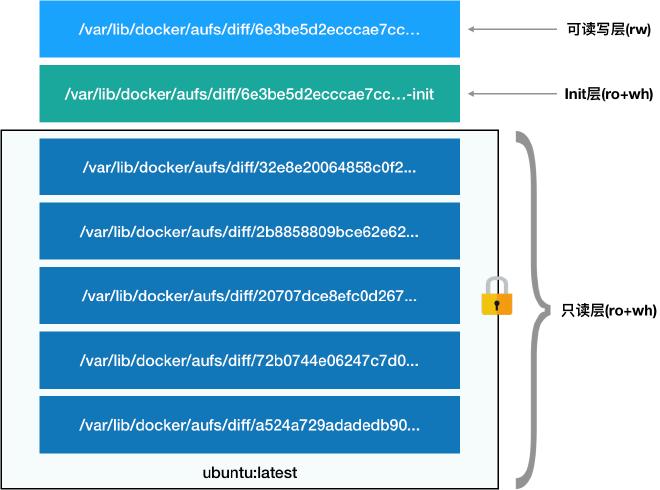
引入层(layer) 的概念,即制作镜像的每个操作生成一个层(增量 rootfs)(联合文件系统,联合挂载)

第一层:只读层。即容器 rootfs 最下面得五层
第二层:可读写层。最上面的一层。在没有写入文件之前,这个目录是空的。一旦在容器里做了写操作,修改产生的内容就会以增量的方式出现在这个层中。删除操作则创建一个 whiteout 文件将只读层中的文件遮挡住
第三层:Init 层。专门用来存放 /etc/hosts、/etc/resolv.conf 等信息(启动容器是需要写入一些用户指定的值,如 hostname,这些修改往往只对当前容器有效,commit 时不需要连同连同读写层一起提交掉)
而 rootfs 则是通过 bind mount 的方式进行的挂载,如 mount --bind /path1 /path2,其作用就是将 /path2 的 dentry 指向了 /path1 的 inode,所以如果对 /path2 做的读写操作实际上等同于对 /path1 的操作。
与其他 Namespace 不同,只有进行挂载操作(Mount)后,才能改变容器进程视图。容器在启动 mount namespace 之后再执行 mount 操作,此时还能看到宿主机的路径,随后执行 chroot 操作,完成文件系统的隔离。
Containerd #
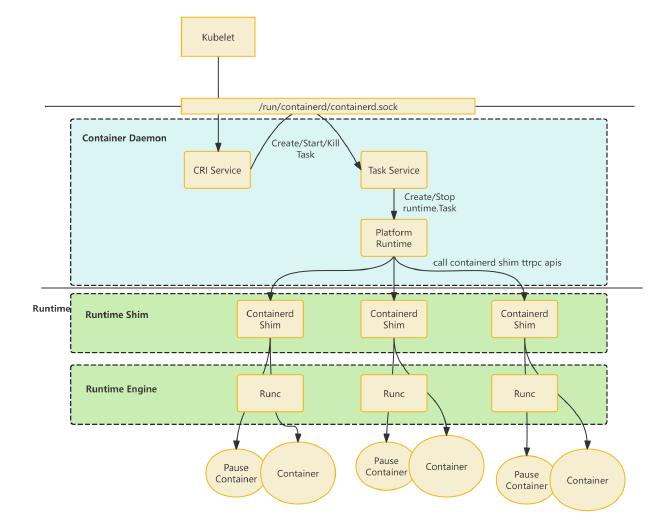
Containerd 是一个高度模块化的容器运行时,启动后,主进程会在 grpc server 下注册一系列的 grpc service,如 CRIService、TasksService 等
Containerd 的具体功能基本都是通过调用这些 gRPC service 完成的,启动后会启动一个 gRPC server,默认监听位置为 /run/containerd/containerd.sock
CRI Service #
在 Kubernetes 中,在 node 上,kubelet 通过 CRI 调用 containerd 来创建 sandbox(pod)、container 等,而 Containerd 提供了 CRI GRPC 接口供 kubelet 使用。而对于 docker 原生项目,Containerd 提供了原生的 Grpc 接口。
Runtime #
containerd 不负责创建或删除容器等操作,这些操作交给下层的 runtime 来做。默认使用 Runc 作为底层 runtime,采用 OCI-runtime 标准。其创建容器就是通过标准的 OCI-runtime 调用底层 runc 实现。而 runc 则在 containerd 准备的 rootfs 上,引导启动容器进程。
创建容器的顺序为:
- containerd daemon 接收来自 client 的创建 container 的请求(可能是 kubelet 通过 cri 发起的,或者 ctr、nerdctl 这些 client 发起的)
- containerd daemon 准备容器所需的 rootfs 和 container 配置信息(OCI runtime config)
- containerd daemon 将 rootfs、配置信息发送给 runtime
- runtime 接收来自 containerd daemon 的创建容器的请求。runtime 执行系统调用,创建容器进程,并启动一个守护进程(containerd shim),暴露并监听一个 unix socket,同时将这个 socket 信息写到 stdout
- containerd daemon 从 stdout 中读到这个 unix socket 信息,并在后续通过这个 socket 与 runtime 交流,以获取 container 中的状态信息等
在具体实现中 containerd 的 runtime 分为两个部分
- runtime shim
- shim 是与 containerd daemon 直接沟通的结构。是一个二进制文件,在 v1.7 版本中为
containerd-shim-runc-v2,containerd daemon 会直接调用这个二进制文件,创建一个 containerd shim 进程
- shim 是与 containerd daemon 直接沟通的结构。是一个二进制文件,在 v1.7 版本中为
- runtime engine
- 即我们常说的狭义上的容器运行时,如 runc。以二进制形式存在,runtime engine 是真正负责调用操作系统接口以创建、启动和删除容器的模块。它只会和 runtime shim 通信

创建 pod 流程 #
kubelet 依次调用 RunPodSandbox、CreateContainer、StartContainer 三个接口来创建 pod 中的容器。
RunPodSandbox #
- kubelet 通过内置的 CRI client 调用 containerd 的 cri service 的
RunPodSandbox(gRPC call) - cri service 根据 gRPC Request(
RunPodSandboxRequest)中描述创建SandboxInfo,存储到本地的 metadata 数据库中(blot 数据库,一个本地键值对存储) - cri service 创建 network namespace,并调用 CNI 插件初始化 container network
- cri service 启动 sandbox,主要把 pause container 跑起来。这里启动 pause container 的步骤与后续启动业务 container 的步骤基本相同
CreateContainer #
准备 container 的运行环境,并不会在系统中真正创建 container
- kubelet 通过其内置的 CRI Client 调用 containerd 的 cri service 的
CreateContainer(gRPC call) - cri service 从 gRPC Request (CreateContainerRequest)的描述中,得到 sandbox id,并据此从 metadata 数据库中找到之前创建的 sandbox 对象
- cri service 根据
CreateContainerRequest中的描述,创建并配置 Container 对象。其中重要的配置步骤包括- 根据 snapshotter 的配置,对镜像 unpack 以构建 container 的 rootfs
- 生成 oci runtime spec
- cri service 将 Container 对象写入到 metadata 数据库中
StartContainer #
- kubelet 通过其内置的 CRI client 调用 containerd 的 cri service 的
startContainer - cri service 从 gRPC Request(
StartContainerRequest)的描述,得到 sandbox id,并据此从 metadata 数据库中找到之前创建的 sandbox 对象 - cri service 从 metadata 数据库中找到之前创建的 container 对象
- cri service 创建
Task对象。一个运行态的 container 在 containerd 的内存中是使用Task对象来描述的。所以。创建实际运行的 container 的过程,其实就是创建并启动Task的过程。具体过程:- cri service 会通过 gRPC call 调用 TaskService(也是一个监听
/run/containerd/containerd.sock的 gRPC service)尝试创建Task对象 - TaskService 调用 PlatformRuntime(PlatformRuntime 是个接口,具体的实现是 TaskManager)创建
runtime.Task - TaskManager 尝试启动一个 containerd shim 进程
- 如果当前要创建的 container(
Task)属于某个已创建的 Sandbox(比如,创建业务 container 时,本质上是向之前已经创建了 pause container 的 sandbox 中添加 container,此时,已经存在当时创建 pause container 时创建的 shim 进程),那么不创建新的 shim 进程(即,同一个 Pod sandbox 下的 container 会复用同一个 shim 进程) - 否则,执行
containerd-shim-runc-v2这个二进制,启动一个 shim 进程,该 shim 进程会启动一个 ttrpc service,并把其所监听的 unix socket 地址返回给 TaskManager
- 如果当前要创建的 container(
- TaskManager 通过 ttrpc 接口调用 shim 进程 5.shim 进程调用 runc(或者其他的 OCI runtime engine)以创建容器进程
- cri service 会通过 gRPC call 调用 TaskService(也是一个监听
Snapshot #
OCI 镜像格式分为多层(layer1、layer2、layer3…),而最终的文件系统内容基于每层的 merge 构建。我们假设每 merge 一层,就会生成一个 snapshot。
而在创建 $snapshot_2$ 时,需要首先将 $snapshot_1$ 整个 copy 到一个目录中,然后再 apply $layer_2$ 中的 diff。这会导致:
- 不必要的文件拷贝带来的耗时
- 文件反复拷贝带来的存储冗余。对于 $snapshot_1$ 中的内容要被存储 n 次
对于以上问题,有很多解决方法,比如使用 AUFS、overlayfs 这样的联合文件系统,或 btrfs、ZFS 等支持快照的文件系统,这样避免了 merge 时对上级 snapshot 的全量复制。而这些方式,都需要经过一个 “根据 layer 创建 snapshot” 的过程,这个过程针对上述的不同的方法有着不同的实现。
containerd 将这个行为抽象出来,成为了一个独立的组件,即 Snapshotter,就可以根据不同的场景,选择不同的 snapshotter 来创建和管理 snapshot,进而决定如何构建 rootfs。而用户也可以自定义这一接口,通过 gRPC 的封装,然后注册到 containerd 中使用。
Snapshotter #
Snapshotter 接口定义:
type Snapshotter interface {
	// Stat returns the info for an active or committed snapshot by name or
	// key.
	//
	// Should be used for parent resolution, existence checks and to discern
	// the kind of snapshot.
	Stat(ctx context.Context, key string) (Info, error)

	// Update updates the info for a snapshot.
	//
	// Only mutable properties of a snapshot may be updated.
	Update(ctx context.Context, info Info, fieldpaths ...string) (Info, error)

	// Usage returns the resource usage of an active or committed snapshot
	// excluding the usage of parent snapshots.
	//
	// The running time of this call for active snapshots is dependent on
	// implementation, but may be proportional to the size of the resource.
	// Callers should take this into consideration. Implementations should
	// attempt to honor context cancellation and avoid taking locks when making
	// the calculation.
	Usage(ctx context.Context, key string) (Usage, error)

	// Mounts returns the mounts for the active snapshot transaction identified
	// by key. Can be called on a read-write or readonly transaction. This is
	// available only for active snapshots.
	//
	// This can be used to recover mounts after calling View or Prepare.
	Mounts(ctx context.Context, key string) ([]mount.Mount, error)

	// Prepare creates an active snapshot identified by key descending from the
	// provided parent.  The returned mounts can be used to mount the snapshot
	// to capture changes.
	//
	// If a parent is provided, after performing the mounts, the destination
	// will start with the content of the parent. The parent must be a
	// committed snapshot. Changes to the mounted destination will be captured
	// in relation to the parent. The default parent, "", is an empty
	// directory.
	//
	// The changes may be saved to a committed snapshot by calling Commit. When
	// one is done with the transaction, Remove should be called on the key.
	//
	// Multiple calls to Prepare or View with the same key should fail.
	Prepare(ctx context.Context, key, parent string, opts ...Opt) ([]mount.Mount, error)

	// View behaves identically to Prepare except the result may not be
	// committed back to the snapshot snapshotter. View returns a readonly view on
	// the parent, with the active snapshot being tracked by the given key.
	//
	// This method operates identically to Prepare, except the mounts returned
	// may have the readonly flag set. Any modifications to the underlying
	// filesystem will be ignored. Implementations may perform this in a more
	// efficient manner that differs from what would be attempted with
	// `Prepare`.
	//
	// Commit may not be called on the provided key and will return an error.
	// To collect the resources associated with key, Remove must be called with
	// key as the argument.
	View(ctx context.Context, key, parent string, opts ...Opt) ([]mount.Mount, error)

	// Commit captures the changes between key and its parent into a snapshot
	// identified by name.  The name can then be used with the snapshotter's other
	// methods to create subsequent snapshots.
	//
	// A committed snapshot will be created under name with the parent of the
	// active snapshot.
	//
	// After commit, the snapshot identified by key is removed.
	Commit(ctx context.Context, name, key string, opts ...Opt) error

	// Remove the committed or active snapshot by the provided key.
	//
	// All resources associated with the key will be removed.
	//
	// If the snapshot is a parent of another snapshot, its children must be
	// removed before proceeding.
	Remove(ctx context.Context, key string) error

	// Walk will call the provided function for each snapshot in the
	// snapshotter which match the provided filters. If no filters are
	// given all items will be walked.
	// Filters:
	//  name
	//  parent
	//  kind (active,view,committed)
	//  labels.(label)
	Walk(ctx context.Context, fn WalkFunc, filters ...string) error

	// Close releases the internal resources.
	//
	// Close is expected to be called on the end of the lifecycle of the snapshotter,
	// but not mandatory.
	//
	// Close returns nil when it is already closed.
	Close() error
}
其中,Prepare() 方法用于创建一个 active 状态的 snapshot,经过 mount 之后,调用 Commit 方法,将其转化为一个 committed 状态的 snapshot,此时 snapshot 可以作为下一层 snapshot 的 parent。
在 OCI 镜像格式中,对于镜像层,记其 diff id 分别为 $(diffid_1, diffid_2, diffid_3, …, diffid_n)$,那么 chain id 的计算方式如下: $$chain_id_1 = diff_id_1$$ $$chain_id_n = f_{digest}(f_{append}(chain_id_{n-1}, diff_id_n)) $$ 可以看到, $layer_n$ 的 chain id 是由 $(layer_1, layer_2, layer_3, …, layer_n)$ 共同决定的,即包含了所有的“祖先” layer。
构建过程 #
以 native snapshotter 为例
- 处理 $layer1$
-
containerd 调用 Snapshotter 的 Prepare 方法
sn.Prepare(ctx, key, parent.String(), opts...)通知snapshotter为 $snapshot_1$ “准备”一个工作目录。说明一下这个函数的参数:key是个包含了当前了 $layer_1$ 的 chain id 的 $chain_id_1$ 的随机字符串parent.String()是当前正在处理的 layer 的 parent layer 的 id,由于当前处理的是 $layer_1$,它没有 parent,所以这里的 parent.String() 是 ""
-
native snapshotter 接收到 Prepare 的通知后,发现传入的 parent 是空,于是准备一个全新的空白目录,并返回之。注意,这里返回的不是一个路径名字符串,而是一个 Mount 结构体数组。表示其中的 Mount 定义如下:
// Mount is the lingua franca of containerd. A mount represents a
// serialized mount syscall. Components either emit or consume mounts.
type Mount struct {
	// Type specifies the host-specific of the mount.
	Type string
	// Source specifies where to mount from. Depending on the host system, this
	// can be a source path or device.
	Source string
	// Target specifies an optional subdirectory as a mountpoint. It assumes that
	// the subdirectory exists in a parent mount.
	Target string
	// Options contains zero or more fstab-style mount options. Typically,
	// these are platform specific.
	Options []string
}
即 snapshotter 告诉 containerd 备好了一个目录
Source,你应该使用Type类型的挂载方式挂载到某个目录下面来用。同时,你挂载的具体位置,应该是${你自定义的目录}/Target,挂载的时候记得用我给你的Options。比如,native snapshotter 接收到 Prepare 的通知后,准备了一个路径为
/path/snapshot/1的空目录,那么它应该返回的 Mount 结构体数组大致是这样的:mounts := []Mount{ { Type: "bind", Source: "/path/snapshot/1", Target: "", Options: []string{"rbind", "rw"}, }, } -
接着,containerd 拿到了 native snapshotter 返回的 mounts,然后尝试使用 mountpackage 下的
All(mounts, root)方法,将 mounts 中的各个 Source 挂载到 root 下。 细节如下:- containerd 创建临时目录,记为
root,我们假设其为/path/to/tmp/root/1 - 遍历
mounts数组,发现只有一个,去除这个唯一一个元素mount - 取出
mount中的target,将其拼接到/path/to/tmp/root/1后面,得到最终的挂载路径finalTarget。由于Target是"",所以finalTarget就是/path/to/tmp/root/1 - containerd 调用 mount,根据
mount中的Type,将mount的Source挂载到finalTarget中。本例中,相当于执行了:mount --bind /path/snapshot/1 /path/to/tmp/root/1
- containerd 创建临时目录,记为
-
现在 containerd 知道
/path/to/tmp/root/1就是 $snapshot_1$ 的工作目录。它将 $layer_1$ 拆包解压,并 apply 到/path/to/tmp/root/1中。 由于/path/to/tmp/root/1被挂载了一个空目录,所以这一步相当于把 $layer_1$ 拆包后的所有文件 copy 到/path/to/tmp/root/1中 -
containerd 调用 snapshotter 的
Conmmit方法sn.Commit(ctx, chainID.String(), key, opts...),通知 snapshotter ”提交“ 当前的 snapshot。 这一步时机是 containerd 通知 snapshooter 已经处理完成当前 snapshot,需要持久话它的信息到 metadata 数据库中,以备后续使用 这个函数的各参数:chainID.String()是 containerd 希望 snapshotter 持久话这个 snapshot 时使用的 Name,后续 containerd 都将使用这个 Name 来索引这个 snapshot。这个例子中的值就是 $layer_1$ 的chain\_id_1key是最开始 containerd 调用Prepare· 函数时给定的随机字符串,用以告诉 snapshotter 要持久化的是哪个 snapshot
-
- 处理 $layer_2$
- containerd 调用 Snapshotter 的
Prepare方法sn.Prepare(ctx, key, parent.String(), opts...),通知 snapshotter 为 $snapshot_2$ “准备”一个工作目录。此时函数参数:key是个包含了当前了 $layer_2$ 的 chain id 的 $chain_id_2$ 的随机字符串($layer_1$ 和 $layer_2$ 的diff id总和哈希之后的结果)parent.String()当前处理的是 $layer_2$,它的 parent 是 $layer_1$,所以这里的 parent.String() 是 $layer_1$ 的chain\_id_1(即Commit$snapshot_1$ 时使用的 Name
- native snapshotter 接收到
Prepare的通知,首先创建一个空白目录dir2,根据传入的Parent$chain_id_1$ 从 metadata 数据库中查到 $snapshot_1$ 的目录dir1,接着将dir1中的内容 cpy 到dir2中,然后使用dir2作为Source,和处理 $layer_1$ 时一样,组装Mount数据并返回 假设dir2是/path/to/tmp/root/2,那么返回的Mount数据大致是这样的:mounts := []Mount{ { Type: "bind", Source: "/path/snapshot/2", Target: "", Options: []string{"rbind", "rw"}, }, } - containerd 拿到 native snapshotter 返回的
Mount,尝试使用mountpackage 下的All(mounts, root)方法,将 mounts 中的各个 Source 挂载到 root 下。- containerd 创建临时目录,记为
root,我们假设其为/path/to/tmp/root/2 - 遍历
mounts数组,发现只有一个,取出这个唯一一个元素mount - 取出
mount中的target,将其拼接到/path/to/tmp/root/2后面,得到最终的挂载路径finalTarget。由于Target是"",所以finalTarget就是/path/to/tmp/root/2 - containerd 调用 mount,根据
mount中的Type,将mount的Source挂载到finalTarget中。本例中,相当于执行了:mount --bind /path/snapshot/2 /path/to/tmp/root/2
- containerd 创建临时目录,记为
- 现在 containerd 知道
/path/to/tmp/root/2就是 $snapshot_2$ 的工作目录,且/path/to/tmp/root/2中应包含和 $snapshot_2$ 中相同的内容。它将 $layer_2$ 拆包解压,并 apply 到/path/to/tmp/root/2中。这样/path/to/tmp/root/2将是 $layer_1$ 和 $layer_2$ 的联合。 - Commit
- containerd 调用 Snapshotter 的
- 处理 $layer_3$ 已经剩余所有的 $layer$。处理完成后,我们得到一个目录 $snapshot_n$,其中包含所有 layer 合并之后的内容,即当前镜像中的所有内容
overlay snapshotter #
native snapshotter 每层文件都会被来回 copy,有大量的运行时开销和存储空间占用。而 overlay snapshotter 则解决了这个问题
- 在处理 $layer_1$ 是 overlay 和 native 基本没有区别
- 当处理 $layer_2$ 时,overlay snapshotter 在创建了那个为 $snapshot_2$ 准备的临时目录后,overlay 不会将 $snapshot_1$ 中的文件都 copy 到这个临时目录中,而是直接返回
Mount数组。数组中的唯一的mount元素告诉 containerd:使用 overlay 方式挂载,lowerdir 是 $snapshot_1$ 的目录,upperdir 是准备的这个临时目录。通过这样的命令,containerd 最终得到的 mergeddir 将会展现出 lowerdir(即 $snapshot_1$ 的目录)的样子,而 containerd 在后续 apply $layer_2$ 拆包后的文件时,对文件系统的更改会反应在 upperdir(即 $snapshot_2$)的目录中。 - 后续 layer 处理相同
snapshot 到 rootfs #
最终得到的 snapshot 是 $snapshot_n$,但是容器进程不能直接在 $snapshot_n$ 的目录进行读写,因为多个容器需要共享同一个镜像
contaienrd 的做法:创建容器时依次:
- unpack 镜像,得到 $snapshot_n$
- 调用 snapshotter 的
Prepare方法,此时传入的parent是 $layer_n$ 的chain id。- 如果是 native snapshotter,会创建一个新的目录,并将
parent,也就是 $snapshot_n$ 的目录中的所有文件都 copy 到这个新的目录中,然后返回一个Source就是这个新的目录new_dir,Type是bind的Mount结构。这样 containerd 可以直接将new_dirmount 到path/to/runtime/bundle/rootfs上。容器进程实际是在new_dir上读写 - 对于 overlay snapshotter,会创建一个新的目录,但是不做 copy 动作。而是创建一个新的目录
new_dir之后直接返回一个Mount结构,这个Mount结构指明 lowerdir 是 $snapshot_1$ 到 $snapshot_n$ 的所有的目录,upperdir 是new_dir,并且需要使用 overlay 类型 mount 到path/to/runtime/bundle/rootfs上。这样/path/to/runtime/bundle/rootfs作为 mergeddir,可以看到 $snapshot_1$ 到 $snapshot_n$ 的所有目录合并后的文件系统(即 image 的所有层合并后的结果),同时也是可写的。容器进程所有执行的对文件系统的更改都将反应在 upperdir 也就是new_dir中
- 如果是 native snapshotter,会创建一个新的目录,并将
- 使用上述 mount 后的目录,即
/path/to/runtime/bundle/rootfs作为 bundle 的 rootfs,并结合生成的 config 文件,调用 runc 以创建容器
